
API Key Authentication: How It Works and How to Secure It
Learn how API key authentication works, how keys are passed and validated, and how to store, scope and rotate them safely.
You've copied an API key from a dashboard, pasted it into a script, and the first request worked. Then someone pushes that script to a shared repo, a teammate pastes the key into a browser fetch call, and nobody's sure who else can now spend your credits. That's the moment most developers meet API key authentication properly. It's simple to start, and simple to misuse, because the key proves less than it looks like it does.
Table of Contents
- What an API Key Actually Proves
- How Keys Travel and Get Checked on Each Request
- Where to Store Keys and Where Never to Put Them
- Scoping Permissions and Spend Limits per Key
- Rotating and Revoking Keys Without Downtime
- Diagnosing 401, 403 and 429 Errors Fast
- When Key-Only Access Is Not Enough
- Create Your Key and Confirm It Works
What an API Key Actually Proves
Think of a hotel keycard. It opens the door for whoever holds it, and the lock doesn't check the face of the person holding it. An API key works the same way. It identifies a calling application, such as a dashboard, a script, or a backend service, and it shows the request arrived with a credential issued to an account.
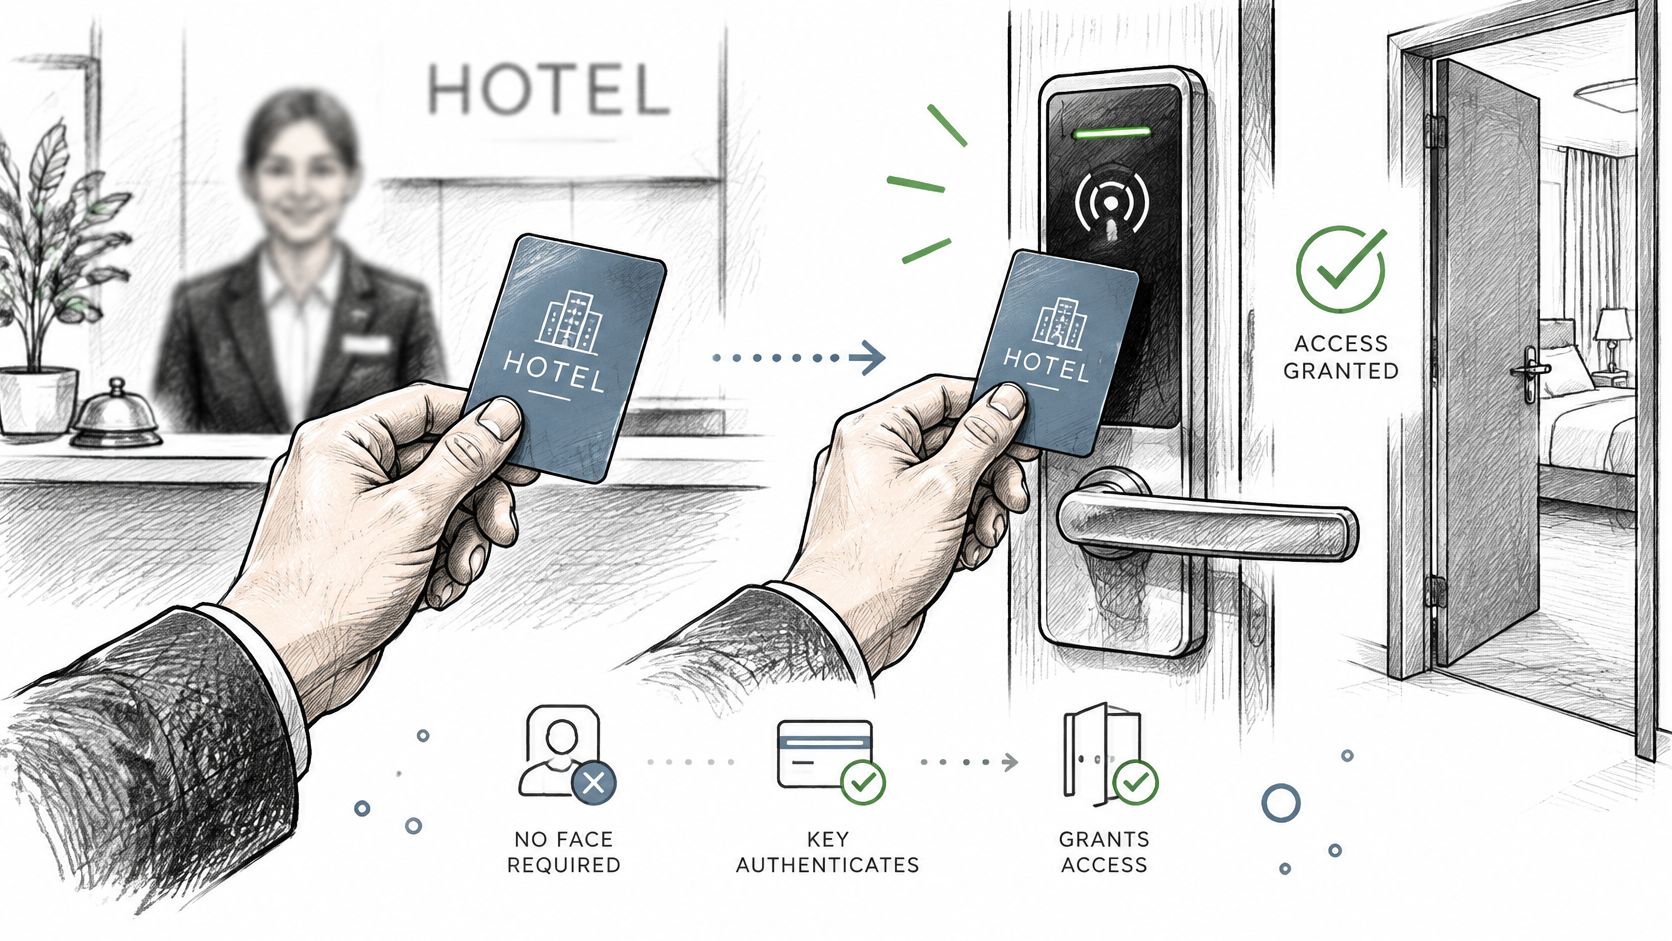
It doesn't prove which person pressed the button. It also doesn't prove that person should be doing it.
Authentication Is Not Authorization
Authentication answers who or what is calling. Authorization answers what that caller may do. A key handles the first question at application level. Your server still has to decide the second one, endpoint by endpoint.
A key proves possession, not identity.
Most keys carry three parts in practice. There's a public identifier you can log safely, a secret value you must protect, and the permissions or limits attached server side. Anyone who gets the secret can act as that application until you expire or revoke it.
That boundary matters at scale. In 2024, 78.2% of API security incidents relied on authentication or authorization issues as a primary attack vector, according to FireTail's 2024 API Security Report. Attackers don't need to break encryption if they can borrow a valid credential or exploit a missing permission check.
Run a quick test on your own integration today. List every place a request is made, then write down which application or person each key stands for. If one key stands for everyone, you don't have user attribution. You have one shared keycard copied for the whole building.
How Keys Travel and Get Checked on Each Request
The flow below shows the basic path from client request to server validation.
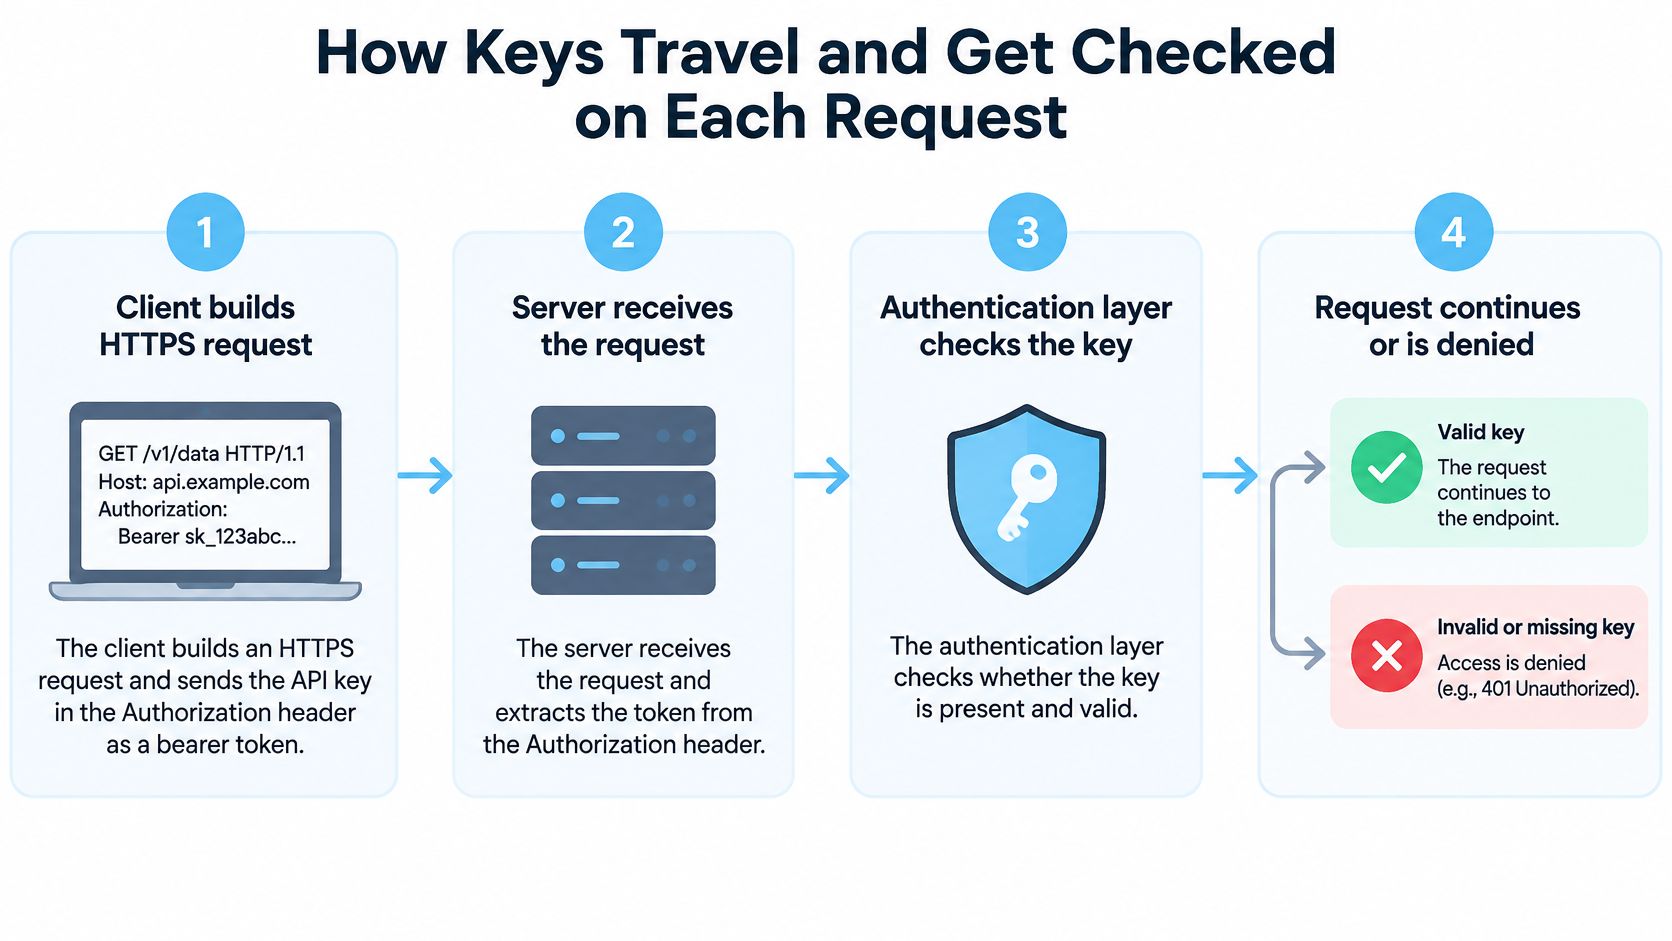
Every request follows the same sequence, and it can fail at a different step for a different reason.
- Client builds the request. Your code sends an HTTPS request and places the key in an Authorization header as a bearer token, or in an x-api-key header where the service accepts it.
- Client keeps the key out of the URL. Proxies, analytics tools, and browser history record query strings, so a key in a URL gets copied into logs you may never inspect.
- Server looks up the key. It reads the header and checks the value, ideally against a stored hash rather than plain text.
- Server checks status. The key must be active, not revoked, and not expired.
- Server checks permission and balance. It confirms this key may call this endpoint and the account has enough credits.
- Server checks rate limits. A request over the limit gets HTTP 429 with guidance on when to retry.
- Server responds. You get data with metadata such as a request identifier, credits charged, and remaining balance, or a typed error explaining the rejection.
For a concrete walkthrough of header formats and expected responses, the API authentication documentation shows how another provider expects the credential on each call. Compare that format to your provider's before you debug anything else, because a correct key in the wrong header looks identical to a missing key.
The short video below demonstrates the same request and validation cycle end to end.
Before you trust an integration, send one request with a deliberately wrong key. Confirm it returns 401. If it doesn't, your error handling, or the route itself, isn't checking what you think it's checking.
Where to Store Keys and Where Never to Put Them
Most leaks aren't cryptography failures. They're operational mistakes, such as a key committed to a repo or printed in a log. The table ranks common locations by the leak path each one creates.
| Location | Risk | Use instead |
|---|---|---|
| Source code or Git repository | High, copied into every clone, fork and backup | Secret manager or environment variable injected at runtime |
| URL query string | High, captured by server, proxy and analytics logs | Authorization header |
| Browser JavaScript or mobile app binary | High, readable by anyone who downloads the app | Your own backend holds the key and makes the request |
| Plain .env file shared or committed | Medium-high, spreads through copies, chat and backups | Gitignored file on the server plus secret scanning |
| Environment variable on a server | Medium, visible to process inspection and crash dumps | Managed secret store with access logs |
| Managed secret store injected at runtime | Low, access is controlled and audited | Recommended default for production |
The Rows That Cause Real Leaks
Source code is the worst offender because Git never forgets. Deleting a key in a later commit doesn't remove it from history, clones, or forks. Run secret scanning across full history and all branches, not just the current files.
Client-side code is next. Browser JavaScript and mobile binaries ship to devices you don't control, and anyone can extract strings from them. The fix isn't obfuscation. Route the call through your own backend, which holds the provider key and makes the request server to server.
URLs leak. A key after a question mark lands in web server logs, proxy logs, analytics events, and browser history. Headers aren't logged by default in the same way, and you should still redact authorization headers in your own logs.
Practical Storage Rules
Inject keys at runtime from a managed secret store such as AWS Secrets Manager, Google Cloud Secret Manager, Azure Key Vault, or HashiCorp Vault. Give each service only the secrets it needs, and turn on access logs so you can see who read a key and when.
Practical rule: if the code that holds the key can be downloaded, viewed, or printed by a user, the key is in the wrong place.
Scoping Permissions and Spend Limits per Key
Say your staging key is capped at 500 credits and it leaks during testing. An attacker burns at most those 500 credits while production stays untouched. That one decision turns a bad day into a contained incident.
A key with no limits does the opposite. A bearer credential proves possession of a key issued to your application, nothing more, so whoever holds it can spend whatever the account carries. On a prepaid API that means denial of wallet: an attacker drains your credits even though the underlying data is public.
The Instagram API issues one kind of key, created and revoked from the dashboard and shown in full only once, so the scoping work happens in your code rather than on the key itself. Build these controls into the application that holds it:
- One key per application: the dashboard, the cron job, and the mobile backend each get their own key, so revoking one leaves the rest running.
- One key per environment: staging keys never reach production data or share a production budget.
- Endpoint allowlists in your backend: your server decides which routes each key may call, so a service that only reads profile data never forwards requests anywhere else.
- Budgets counted in credits, not requests: deeper endpoints cost more per call, so log the credits charged in each response and stop when the budget is spent.
- Rate caps in your own layer: throttle bursts so a loop or an attacker cannot drain the budget in minutes.
- Alerts to the owner: warn at 50 and 80 percent of budget, and treat 100 percent as an incident.
Revisit the allowlist whenever you ship a feature, and watch for request spikes, repeated invalid identifiers, and a sudden change in credit burn. Those signals usually surface before a person notices the leak. When you size the budget, base it on expected monthly calls from the prepaid credit pricing rather than the full balance you bought.
Rotating and Revoking Keys Without Downtime
Rotation fails when teams revoke first and deploy second. Use the trigger table to decide how fast to act, then use overlap so traffic never breaks.
| Trigger | Action | Timing |
|---|---|---|
| Routine schedule | Issue new key, deploy, verify, then revoke the old key | On a fixed calendar interval set by policy |
| Employee or contractor leaves | Revoke keys they held and rotate any shared keys | Same day |
| Key found in a repository or log | Revoke immediately, then rotate and review usage | Within minutes |
| Unusual spend or request spike | Revoke, review request identifiers, then reissue | Immediately, investigate after |
| Breach at a vendor or dependency | Rotate every key that dependency could access | As soon as the vendor confirms the breach |
| New environment, such as a new cloud account | Create a separate key for that environment | Before go-live |
The Overlap Method
- Create the new key while the old key stays valid.
- Deploy it to one service or environment first.
- Confirm success by checking responses and logs for that service.
- Roll it out to every remaining service.
- Revoke the old key only after traffic has moved.
- Record the change with date, owner, and reason.
Overlap matters because services cache config at startup and deploys don't land everywhere at once. Without it, a routine rotation becomes a self inflicted outage.
Speed matters more after exposure. In 2024, 35% of exposed API keys were still active, according to Nightfall AI research reported by Help Net Security. A leaked key that's still active is still usable.
So revoke first, then investigate. Review request identifiers, timestamps, endpoint usage, IP or region anomalies, and credit consumption after the key is dead. Rotate on a schedule even when nothing's wrong, so the process is practiced before an emergency forces it.
Diagnosing 401, 403 and 429 Errors Fast
Status-code errors like these are routine, and the cause is usually boring. In 2024, 38% of respondents reported encountering an authentication issue in a production API during the previous 12 months, according to Salt Security's 2024 State of API Security Report.
Start with the symptom. Regenerating a key before you know which check failed destroys the one piece of evidence you had.
| Symptom | Likely cause | First fix |
|---|---|---|
| 401 with message that the key is invalid or revoked | Typo, copied whitespace or a revoked key | Copy again from the dashboard, trim spaces, confirm it is still active |
| Key worked yesterday, fails after a deploy | New key not loaded by the running service | Confirm the service reads the updated secret value |
| 429 Too Many Requests | Burst above the rate limit | Pause, then batch requests to stay under the limit |
| Credits drop but no data returned | Not-found responses for queried accounts can still be charged | Validate inputs before sending and log credits charged per call |
| Key fails only in one environment | Environment variable name differs from the code | Match the variable name exactly across environments |
Reading the Three Status Codes
A 401 means the server couldn't authenticate the key. Since the key is the only proof your application presents, stale, mistyped, or revoked credentials typically surface first at this point. Compare the value character by character against the dashboard, trim copied whitespace and trailing newlines, then confirm the key hasn't been revoked. The Instagram API returns a 401 stating 'This API key is invalid or has been revoked.' for invalid keys, with error code invalid_api_key.
A 403 on one endpoint, while other calls succeed, means the server recognized the key but refused that particular route. Confirm the path matches the documentation exactly, including the HTTP method and required parameters, and check that the account has access to that endpoint. If the route is spelled correctly and the request is still refused, the account's credit balance is the next place to look.
A 429 means you're sending too fast. Slow down before retrying, then batch or queue requests so bursts stay under the limit. Retrying instantly in a tight loop makes the problem worse and can amplify spend.
The sneaky case is credits dropping with no data returned. A not-found response can still consume credits once the upstream service has been queried, so validate usernames and IDs before sending and log the credits charged per call. Requests that fail earlier in the chain cost nothing: authentication problems, missing or malformed parameters, an empty balance, and provider or network errors on the API side are never charged. The credit charging rules spell out that boundary, so you can separate provider errors from payable not-found results.
When Key-Only Access Is Not Enough
Keys suit server to server calls that retrieve low sensitivity public data, with narrow scopes, rate limits, and fast revocation. That's a real and legitimate use case. It just isn't every use case.
They fail when you need to identify an end user, record consent, act on a user's own account, or run code in browsers and mobile apps. A shared provider key can't tell you which customer triggered a request, and it shouldn't be asked to.
Habit explains many weak setups. In 2024, approximately 84% of organizations relied on bare API keys or basic shared secrets for API authentication, according to Raidiam's 2025 API security profiling study. Many of those systems were never built for user level decisions.
Use the layered pattern instead. Keep the provider key only on your server, authenticate each of your own users separately, and issue short lived application level tokens to them. When third parties need delegated access to user data, OAuth 2.0 is the standard built for that job.
Don't ask one shared secret to prove application, person, and permission at the same time.
Ask four questions before you ship key only access. Does the call run only on your server? Is the data public? Could you revoke the key within minutes? Do you need to know which user acted? If any answer points the wrong way, add user level controls.
Create Your Key and Confirm It Works
A bearer key proves possession, so the first minute of its life decides how much you can trust it later. Copy it once, store it correctly, and prove both the success and failure paths before production traffic ever touches it. For our Instagram API, one key covers public Instagram data over REST with no Instagram OAuth, app review, or business verification. Set it up in this order:
- Create the key in the dashboard for this application and copy it before leaving the page, since keys are shown in full only once. All later creation and revocation happens from that same dashboard.
- Store it server side in your secret manager and inject it at runtime as INSTAGRAMAPI_KEY, using the same variable name in every environment.
- Send a test request with the key as a bearer token in the Authorization header, or use the x-api-key header. Never put it in the URL. A Postman API development tool collection makes this first call easy to repeat without writing throwaway code.
- Confirm success and note the request identifier and credits charged on the response.
- Test failure with a deliberately wrong key and confirm your code handles the 401 response and its invalid_api_key error code. Authentication failures are not charged, so this check costs nothing.
- Watch your own limits by reading the remaining balance returned in each response and enforcing budget thresholds in your application at 50, 80, and 100 percent of planned spend. The API reports the balance; your code enforces the ceiling.
Check that setup against the storage and rotation tables, and keep staging keys out of production entirely. Our full API documentation includes the quickstart and authentication guides for the exact request format.
Create a free key and make your first request in under a minute, with 50 credits on signup and no approvals or OAuth flow to wait through. Instagram API returns structured JSON for public profiles, posts, and insights through that single bearer key, so you can apply the storage, scoping, and rotation checks above to a live integration today.
Pull Instagram data with one API call
Profiles, posts, reels, followers and more. 50 free credits, no credit card.
Get your free key